Week Five
- Feb 4
- 9 min read
Updated: Feb 11
Blog posts arranged newest to oldest.
To-do:
Refine flower vellum simulation
Refine flower and stamen simulations
Get the stamen to stop jittering and have no overlap
Add more noise to the flower petals and work on their movement
Work with Noelle on an animated "wetness" map for the petals
Refine shot 3 camera and ring animation
Combine two frost simulations to refine frost simulation
Mentor Feedback:
Rotation of pedestal is too abrupt on Shot 1
Shot 3, it is lingering too much in the hair, feels like it is caught in the flower, it show gracefully fall down
Shot 2, starting feels like a white surface, need a shadow, maybe values get darker when underwater, needs some shape - Horizon is too hard, maybe depth haze, needs more surface detail - Caustics! - maybe add particles in background for water shot
The sudden drop from water to cloth is not working - Maybe a match cut and then change of weight
Cloth shot is lingering too long, make it snappier but 10% longer on the end to emphasize the boing
More work on the animation for the last shot
Lighting on flower could be punchier, it is flat right now, Losing bevels on the ring for flower shot, Keep the highlight close to the edges to improve lighting, Try smaller light source, Maybe 3 point light set up, Try light linking in karma for flower shot, Flower looks like its made of paper
Backgrounds are nice but make sure they are tracked correctly - Add shadow
Add z dimension
Here is our submitted presentation for week 5 critique:
2/8/26
While renders for week five have already been turned in, I spent today starting on the second frost method so that it can be quickly applied for next week, in combination with the frost method I used this week.
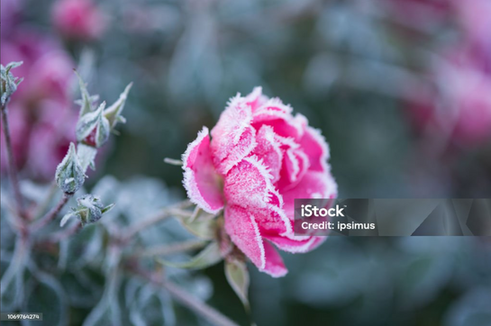
I took to looking at more and more references. The sharper more prominent frost sticks to the edges of the flowers while the petals themselves have more of a dusting with some pointy shapes. I believe I can achieve this look with an ice shader and small points copied onto the surface of the flower.
Images from iStock


Upon looking for other CG examples, I found this work by Josh Clos.
I specifically am looking at how he did his frost layer in this simulation. In the comments of the video, he noted that the frost was "surface points with lots of instanced geometry and an icy shader." This further enforces my plan to use points for this frost.

To achieve this effect with variation and noise in the growth, I used the pyro source spread node.
I was able to use a ramp based on the UV's of the flower to scatter the original points only towards the ends of the petals, like the reference images.

After using the pyro source spread, I then copied to points very simple sphere and cone shapes. I believe these shapes will render more realistically as frost, rather than just using points. I used varied pscale to added some variety and ensured the pivot points were in the right location to ensure the geometry does not overlap with the petal geometry. I again used a point deform to deform these points to the moving flower.

I then copied this effect over to the two other groups of petals, again so that each group can have unique noise and timing.

After creating this simulation, my plan for the next week is to keep the procedural simulation I did this week on just the edges, and then use the new simulation on the base of the petals.

2/6/26
Today, I was able to apply the procedural frost onto the flower, along with work on the camera and ring animation, and insert the new beautiful ring model that Noelle finished this week!

I shorted the time at the beginning of the shot in which the ring is falling. I also made sure to match the position of the ring with the last frame of the shot before it, and the first frame of the shot after it. I believe the end animation where the ring pops out of the flower needs a lot of improvement, and I plan on reaching out to my team for some assistance on that as I have not animated much in Houdini and feel I am hitting a wall with the animation.
After testing applying the frost to the edges of the petals yesterday, I then worked on applying another simulation to the base of the petals, and point deforming that as well.
With this method working, I then applied these simulation to the whole flower, grouping the petals and creating different simulations for each group of petals to give variation.
While this frost method works, I believe it needs some serious help in lookdev and more development to be close to readable. It is also very heavy, and I would like to look into optimizing the simulation further.
Here are my general thoughts for shot 3 as we near the end of midterms:
Right now I have frost all over the petals, it definitely needs some sort of animated texture and lookdev work to be believable as right now the general shape is there but it doesn't look right. That being said, I think what my plan is for next week is going to be to have the frost simulation on only the petal edges (scrapping the one that covers the base) and then have an animated procedural texture to add frost to the rest of the petals. This will also give me more control over how the frost melts away on the petals.
I feel like the background might be flattening the shot a little bit. Maybe because the colors are so similar.
2/5/26
Unfortunately, today was spent circling back to the UV issue of the flower and the texturing versus modeling issue. Upon testing the new petal texture maps this week, I discovered the opacity maps don't work with thickened models because you can see inside the middle of the model. I am thinking there are two options: I get rid of the thickness completely which might make the subsurface need adjustments as well as the displacement to work because it will be paper thin. The other option is we keep it thick like it is and I try and model in that variation on the ends.

Testing the options, I took a quick look at the flower with paper thin petals. While some flower models may be able to get away with the super thin petal geometry, because of the shape and camera of this flower, I believe the thickness is necessary. This means variation in petal edges and shape will need to be modeled in.

After this decision, I then played around with adding noise to the petals, both after and before the vellum simulation.

With the changes to the texture and model this week, I believe next week will be when we can really nail the lookdev for the flower.
2/4/26
One of the first things I wanted to focus on today was fixing a UV issue with the petals that was happening last week so that they could properly be textured by Noelle and be given thickness for the subsurface and to resolve the paper-like look that one of the mentors pointed out.
The problem with the original petal UV was that while it working, it did not allow any room for the thickened sides of the petal to receive texture information.

While Houdini has great UV options, I wanted to see what Maya could do with the thickened petal. Therefore, I exported a single petal in Maya and used the auto UV feature. This created a much nicer UV set up.

This texture was a good new starting point for this process. The problem occurred when I tried to actual apply this UV to the model. Due to the vellum simulation, the petals need to be paper thin going into the simulation and can only be thickened afterwards. Using a UV transfer node did not work on the flower post simulation. My plan then pivoted to applying the Maya auto UVs to the petal before the simulation, but then having to select and transform the edges after the simulation and the extrude node, to create the UVs.
The only other adjustment I made was transforming both sides of the petals to overlap so that the texture would be mirrored on both sides, as the texture artist requested.

Now the last issue with this was that the since the petal bloom animates the flowers, some quite a bit, the side UVs were swimming through the texture. To solve this, I used a point deform to move the petals with still UVs into the proper placements.

I finally was able to fix the UV issue and send the new UVs off to the texture artist.

I then began to work on applying the frost to the flower simulation this week. I did some more looking into references.
Images from istock and stockcake


One of the biggest takeaways I have seen from looking at the frosted flower imagery, is the way that the frost almost exclusively stays on the edges of the petals. My plan for the frost will be to have two simulations, one for the petal edges, one for the base of the petals. I also will split the petals up into three separate groups of simulations in order to add variety in the frost and its speed of melting.
Using the procedural frost tool that I built in my last week's blog post, I began testing the edge simulation. I extracted just the edges and attribute painted them to affect where the frost birth points would stick to.

For the direction field that the frost will follow, I used the entire petal to get a more accurate movement, rather than just using the edges.

Lastly, I ensure that I would be able to apply this simulation on the moving and deforming flower, and using a point deform, was able to apply an edge frost simulation to the edges of a couple petals.
2/3/26
Today was another feedback day for the group. Here is the feedback we received from the mentors:
Kyle
Rotation of pedestal is too abrupt on Shot 1
Shot 3, it is lingering too much in the hair, feels like it is caught in the flower, it show gracefully fall down
Shot 2, starting feels like a while surface, need a shadow
Maybe values get darker when underwater, needs some shape
The sudden drop from water to cloth is not working
Maybe a match cut and then change of weight
Cloth shot is lingering too long, make it snappier
More work on the animation for the last shot
Lighting on flower could be punchier, it is flat right now
Molly
Losing bevels on the ring for flower shot
Keep the highlight close to the edges to improve lighting
Try smaller light source
Maybe 3 point light set up
Beck
Try light linking in karma for flower shot
Flower looks like its made of paper
Top surface of water
Horizon is too hard, maybe depth haze, needs more surface detail
Stephen
Backgrounds are nice but make sure they are tracked correctly
Add shadow
Billy
Are the water bubbles too heavy for the weight of the ring?
10% longer on cloth shot to emphasize the boing
Caustics in water shot
Hannah
Nailing lighting on macro shots, need z dimension
maybe add particles in background for water shot
From this feedback session, the group put together our to do list and schedule for the week:
Week Five Group to do:
Work on timing for ring in shots 1,3,5
Rework shot 5 with new model
Lighting focus: 3, then 2, then 1 & 5
Figure out comp deadline with aovs
Week Five Schedule:
Thursday- files to Noelle for lighting for shot 3/2, night time FX get an exr to Wren
Saturday - 6 am render deadline for shot 1/5, lighting deadline to FX by 12 pm on Saturday
Sunday - 6 am render deadline for shot 2/3/4
We were also tasked today with picking a hero shot for the ad. Typically, the here shot is one shot in the ad that shows off the skills of every member of the group. Our ring ad does not quite fit that category as the FX is split up so precisely between three shots. After discussing this with professors, we have decided to have two hero shots and one sub here shot.
Hero shots: shot 3 and shot 2 (flower and water shot)
Sub hero shots: shot 4 (cloth shot)
Today, we also received an update from the motion media student that is working on the project. She was able to deliver a first title test for shot 5.
She also delivered some tests for having text across the screen during the other shots as this is very common in Oura ring ads. Personally, I love the text over the shots and feel it will make the ad look more professional. I am excited to see what the mentors think next week when we incorporate this text.


